转自 https://www.cnblogs.com/phpshen/p/6222935.html
1.先修改yum源 https://webtatic.com
rpm -Uvh https://dl.fedoraproject.org/pub/epel/epel-release-latest-7.noarch.rpmrpm -Uvh https://mirror.webtatic.com/yum/el7/webtatic-release.rpmrpm -Uvh http://dev.mysql.com/get/mysql57-community-release-el7-9.noarch.rpm
2.安装nginx
yum install nginx
3.安装mysql5.7
yum -y install mysql-community-server
4.安装php
yum install php70w-devel php70w.x86_64 php70w-pecl-redis php70w-cli.x86_64 php70w-common.x86_64 php70w-gd.x86_64 php70w-ldap.x86_64 php70w-mbstring.x86_64 php70w-mcrypt.x86_64 php70w-pdo.x86_64 php70w-mysqlnd php70w-fpm php70w-opcache
5.开始简单的配置
添加运行目录
mkdir -p /var/run/mysqld/chown mysql.mysql /var/run/mysqld/
mysql 配置
vim /etc/my.cnf
在[client] 下面添加
default-character-set=utf8在 [mysqld] 下面添加
character_set_server=utf8
init_connect='SET NAMES utf8'collation-server=utf8_general_ci
保存退出
获取初始密码
grep 'temporary password' /var/log/mysqld.log
得到

注意 里面包括开头的 ;号
然后登陆mysql 修改密码
alter user root@localhost identified by 'tyzZ001!'
如果密码太过于简单可能不然修改因为mysql默认设置了密码复杂度 至少8位 必须包含 大小写字母数字及符号
查看密码策略:
show variables like '%password%';
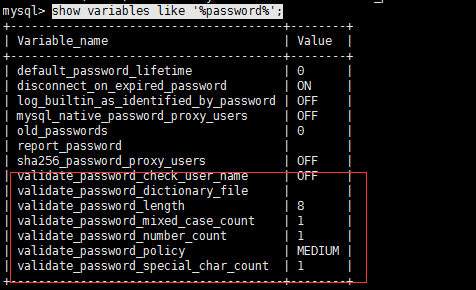
说明:
validate_password_dictionary_file:密码策略文件,策略为STRONG才需要
validate_password_length:密码最少长度
validate_password_mixed_case_count:大小写字符长度,至少1个
validate_password_number_count :数字至少1个
validate_password_special_char_count:特殊字符至少1个 上述参数是默认策略MEDIUM的密码检查规则。
validate_password_policy:密码策略,默认为MEDIUM策略 ,共有如下三种密码策略:
0 or LOW Length
1 or MEDIUM Length; numeric, lowercase/uppercase, and special characters
2 or STRONG Length; numeric, lowercase/uppercase, and special characters; dictionary file
可以通过 set GLOBAL validate_password_policy=0 来修改
或者修改/etc/my.cnf文件
validate_password_policy=0 #0(LOW),1(MEDIUM),2(STRONG)其中一种,注意2需要提供密码字典文件
如果不需要密码策略,添加my.cnf文件中添加如下配置禁用即可:
validate_password = off
添加一个可以在外部登陆的mysql用户
grant all privileges on *.* to 创建的用户名 @"%" identified by "密码";flush privileges;
注意修改配置文件后需要重启mysql
配置nginx:
nginx可以的默认配置文件一般在:
/etc/nginx/nginx.conf
使用 cat 查看一下配置文件
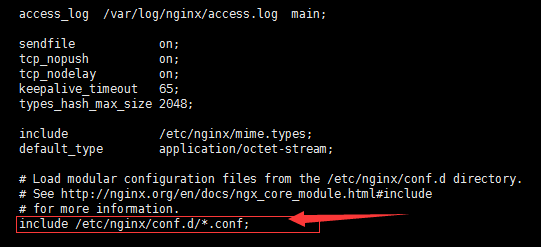
这行表示nginx会引用 conf.d 这个文件夹下面所有.conf后缀的文件
那么在conf.d下面我们来建立我们自己的配置文件
vim /etc/nginx/conf.d/user.conf
在里面写入:
server { listen 80;#端口 server_name admin.com www.admin.com; # 域名 root /home/www/web/newomcat/admin; # 网站根目录 index index.php index.html index.htm;#默认的index # 建议放内网 # allow 192.168.0.0/24; # deny all; location / {if (!-e $request_filename) { rewrite ^/(.*)$ /index.php?$1 last;#去除url中的index.php 不需要可以不写} } location ~ \.php$ { try_files $uri = 404; fastcgi_pass 127.0.0.1:9000; fastcgi_index index.php; fastcgi_param SCRIPT_FILENAME $document_root$fastcgi_script_name; include fastcgi_params; }} 这样 简单的lnmp就安装好了
systemctl restart php-fpm #启动phpsystemctl restart nginx #启动nginxsystemctl restart mysqld #启动mysql
6安装redis
下载源码包:
wget http://download.redis.io/releases/redis-3.2.5.tar.gz
或者使用yum安装也可以
yum install redis
解压下载好的远吗包:
tar -zxf redis-3.2.5.tar.gz
进入解压后的文件夹
cd redis-3.2.5
make编译安装
make
安装完成后 在目录下会有一个 src目录里面放的是 redis的命令 当前目录下会有一个redis.conf 这个是 redis的配置文件 我们需要对他们进行处理一下放别以后的使用
建立两个目录
mkdir -p /usr/local/redis/bin 命令目录mkdir -p /usr/local/redis/etc 配置文件目录
将配置文件移动到/usr/local/redis/ext 目录 将 src下的mkreleasehdr.sh redis-benchmark redis-check-aof redis-check-rdb redis-cli redis-sentinel redis-server redis-trib.rb 这个几个文件移动到/usr/local/redis/bin这个目录
mv ./redis.conf /usr/local/redis/etc/mv mkreleasehdr.sh redis-benchmark redis-check-aof redis-check-rdb redis-cli redis-sentinel redis-server redis-trib.rb /usr/local/redis/bin/
打开 /usr/local/redis/etc/redis.conf 文件 修改配置 让redis在启动时在后台运行

找到这一项 改为 yes 原来为 no
最后将其注册为系统服务
在/etc/init.d/目录下建立redis 文件
vim /etc/init.d/redis
写入内容
########################### #!/bin/sh#chkconfig: 2345 10 90#description:auto_runPATH=/usr/local/bin:/sbin:/usr/bin:/binREDISPORT=6379EXEC=/usr/local/redis/bin/redis-serverREDIS_CLI=/usr/local/redis/bin/redis-cliPIDFILE=/var/run/redis_${REDISPORT}.pidCONF="/usr/local/redis/etc/redis.conf"case "$1" in start) if [ -f $PIDFILE ] then echo "$PIDFILE exists, process is already running or crashed" else echo "Starting Redis server..." $EXEC $CONF fi if [ "$?"="0" ] then echo "Redis is running..." fi ;; stop) if [ ! -f $PIDFILE ] then echo "$PIDFILE does not exist, process is not running" else PID=$(cat $PIDFILE) echo "Stopping ..." $REDIS_CLI -p $REDISPORT SHUTDOWN while [ -x ${PIDFILE} ] do echo "Waiting for Redis to shutdown ..." sleep 1 done echo "Redis stopped" fi ;; restart|force-reload) ${0} stop ${0} start ;; *) echo "Usage: /etc/init.d/redis {start|stop|restart|force-reload}" >&2 exit 1esac########################### 保存退出
设置权限
chmod +x /etc/init.d/redis
设置自动启动:
chkconfig redis on
设置 mysql php nginx 自动启动
systemctl enable redis systemctl enable php-fpm systemctl enable mysqld systemctl enable nginx